|

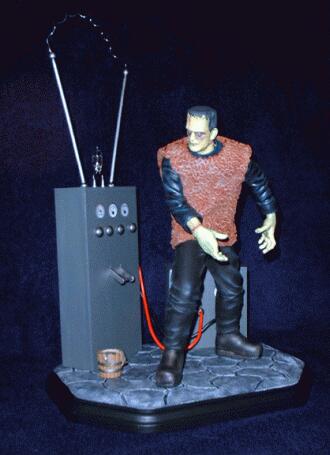
Son of
Frankenstein
with custom built base
GeoMetric Scale 1/8 Vinyl
painted by
Keith
Cousins "Cous3"
|
|
|
This is
the first Geo Monster I've built. A great
kit with some good detail, unfortunately getting
it to stick together was another story, but was
eventually overcome with plenty of cleaning,
scouring and fresh glue. |
|

|
|
|
|
|
|
|
|
First the kit was trimmed, washed
and allowed to dry. Not a lot of puttying to do once the kit is built due to the head, arms, hands having seams that you
can't see anyway, so onto the fun bit.
I started with the head and hands, these were given a basecoat
of Tamiya Flat Flesh. I then used a medium green wash which when dry was followed
by a much lighter green wash. Dark green pastels were used to
darken the creases and around the hair line, under the chin etc.
I wanted the eyes to have that bruised look so more purple
pastels was added around the eyes and then a light dusting of light grey pastel was worked over
the top to dull the purple down a little.
A thin white wash and a fine tipped brush were then used
to lighten the high points of the face and hands (bridge of the nose, brows and knuckles).
|
|
|
|
The fleece was base coated
with a red/brown mix and then dry brushed
with raw sienna
and then tan. I wasn't sure about his shirt but went
with a
midnight blue dry brushed with sea blue, black
pastel was used to darken
the folds. Trousers were simply matt
black dry brushed with
a light grey
for the highlights.
|
|
I
wanted a dungeon/laboratory base for this kit and
so built the machinery from balsa wood, dowel, wire, the
inside of a fluorescent light starter, fuse wire, beads
and the dials were scanned from a car mag then miniaturized
on the PC. The small wooden bucket was bought from a
hobby shop, I painted in the slats and glued two small
rags over the bucket edge. It was then filled with
Milliput and given a greenish tint to look like a kind
of dirty water. |

|
|
|
The
actual base was a cheap edged piece I bought, but I wanted a
flagstone/cobbled
kind of effect on it. This was easier to do
than
I at first thought. I simply roughed up
the surface, mixed up
some plaster of paris (enough to give me a covering of about 1/4") and using a flat tool smeared the plaster over the
base. A tip here is to get the mix right and
work quickly, too
thin and it will run off the base, too thick and it wont spread
and you wont be able to get a smooth finish on it with the flat
tool. Plaster of paris starts to go of within 10 minutes so
speed is foremost. Once the plaster started to go off I took a
rounded tool and carved out the stones, after this the base
was allowed to dry naturally for 24 hours (don't do as I did
before and put it in a warm place, the plaster cracked and the
base warped, it must dry naturally).
When dry I cleaned up the gaps between the stones and gave it
two coats of matt black
and then dry brushed with dark grey and
then light grey, to finish off two coats of matt sealant were
used. |

|
 |
|
|
|
|

|
